How to STLink Ninebot Max/G30 Gen 2 AT32 ESC – Fixes Bricked or Updated Controllers
September 21st, 2023
In the case of a bricked ESC/Controller/Control Board, STLinking can sometimes save the controller from needing to be replaced.
This method can also downgrade versions like DRV 1.8.7 and DRV 1.8.8.
This page shows how to STLink the 2nd gen ESC/controller based on the Artery AT32 chip that comes on 2022 maxes and newer and has screw terminals.
For this process, you will need:
- Windows computer
- STLink (Decent quality clones will work)
- Tools to disassemble the scooter and access the parts
- Dupont male/female jumper cables
This process can be dangerous if done incorrectly so take caution when performing these steps and make sure you use a computer you are comfortable possibly destroying.
If you short a battery line you could end up blowing up your STLink, Computer, and more or even causing a fire.
For the Ninebot ESX Series/SNSC 1.0, use the guide at STLink Ninebot ESX ESC.
Identify Which ESC Generation You Have
Check out the difference between the Ninebot Max ESC Generations and use the steps below depending on which one you have.
There are 3 different board layouts.
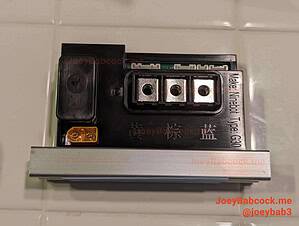
Click the image above to see the guide corresponding to your model.
Accessing the Debug Pins
Start by removing the 18 Security Torx T-15 screws on the bottom.
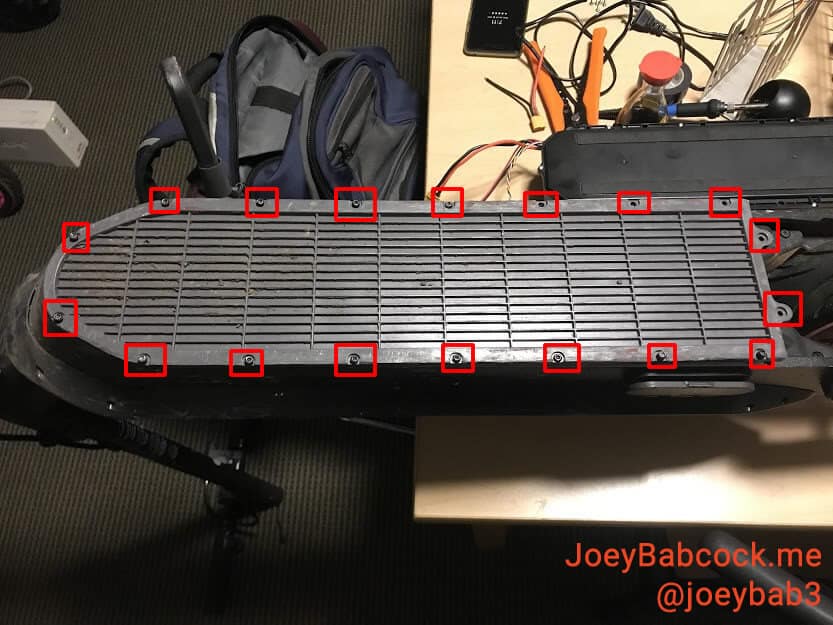
The locations of the 18 screws.
Using an M4 Allen/Hex wrench or bit, remove the two screws holding the ESC in place.
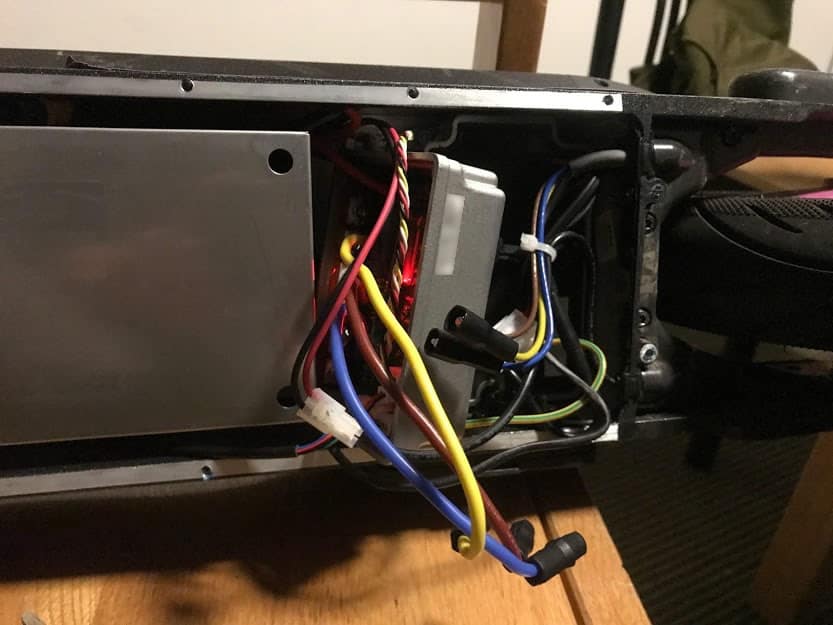
This is a Gen 1 ESC but the Gen 2 will be in the same place.
Carefully unplug each of the connectors.
You may need to scrape more rubber potting compound away from the connectors to unplug them.
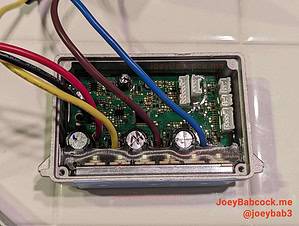
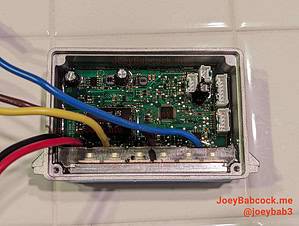
Accessing The Pins
Remove the black shell from the ESC, and take the outer clips off first in order to slide the shell out from under the upper lip.
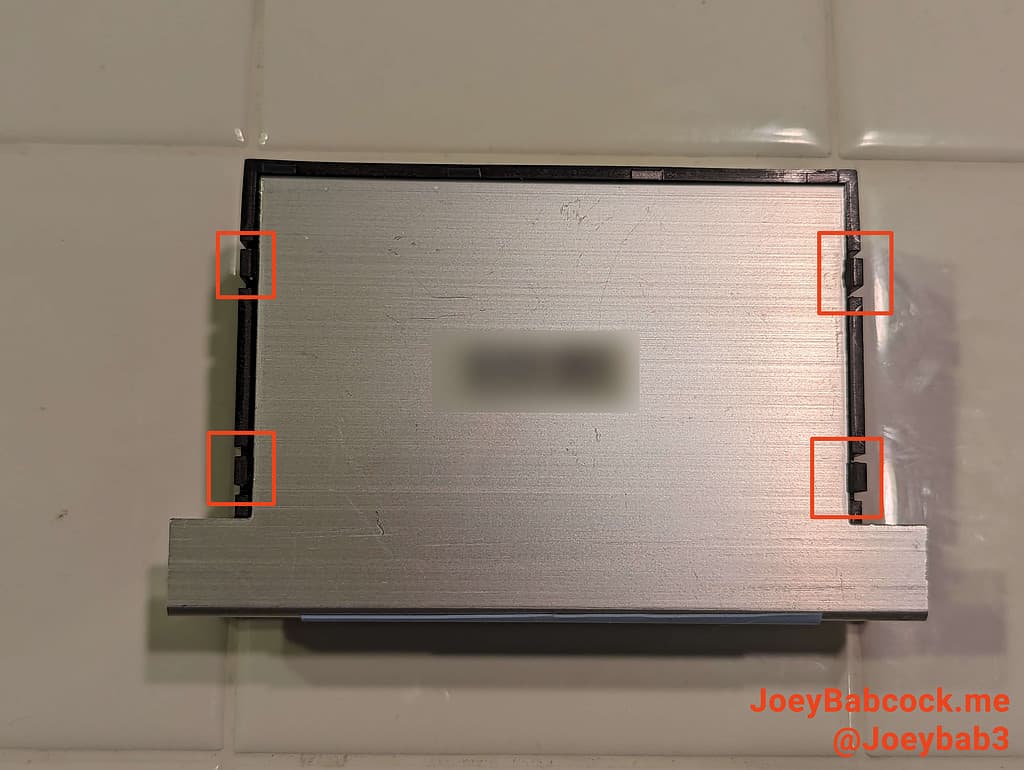
4 clips hold the shell on.
Once removed, locate the debug pins.
The pins are located opposite the white connectors and battery connector.
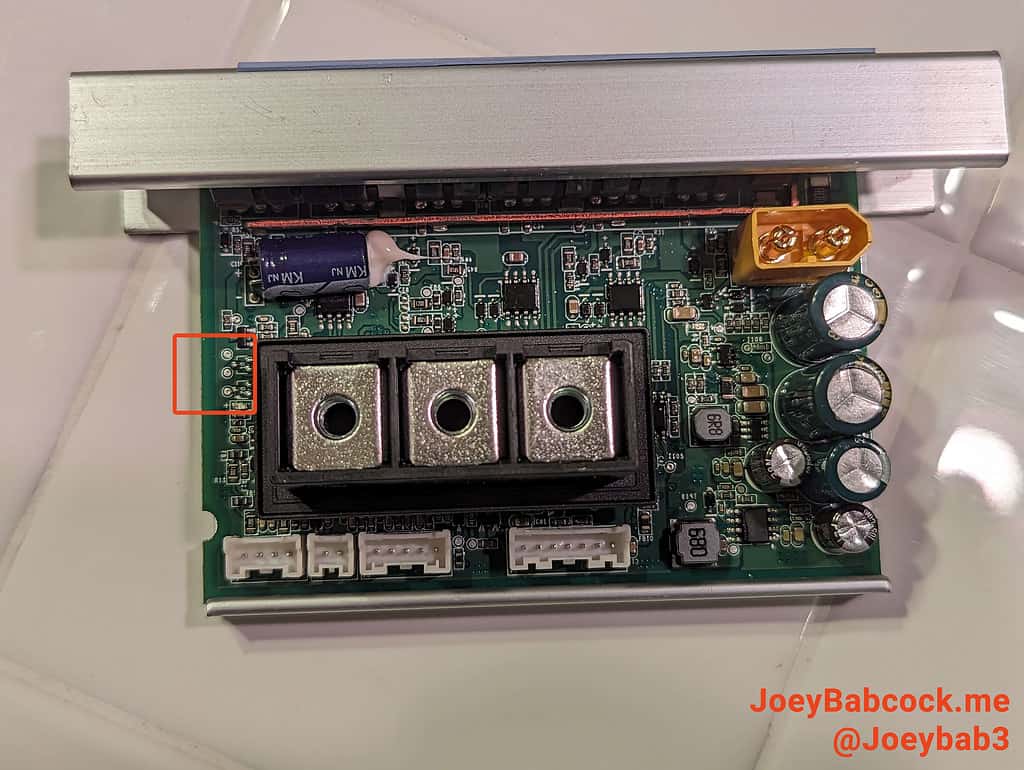
Connect the pins to the STLink as shown:

The connections for the pins of a Gen 2 Master Control Board.
Software
Download ScooterHacking ReFlasher from the ScooterHacking website.
Install it and open it.
Flashing
Once installed, open the software and change your model to Ninebot Max.
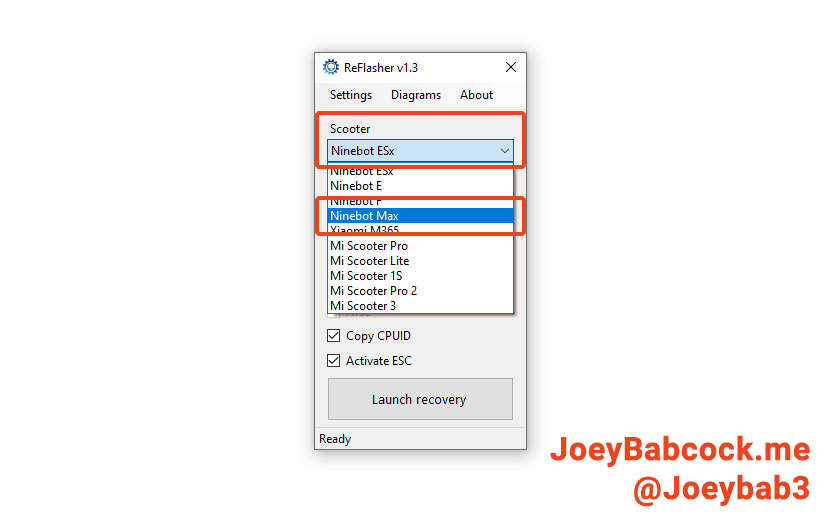
The correct model selected in reflasher.
Make sure you have ‘AT32’ selected as the chip or you will brick your esc.
To show the console (helpful for debugging errors), press settings -> show console.
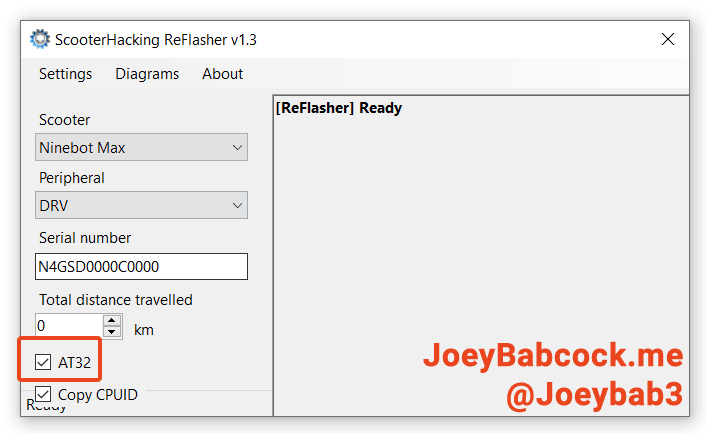
The correct MCU selected in reflasher.
Fill out your serial number and current mileage and press ‘Launch Recovery’.
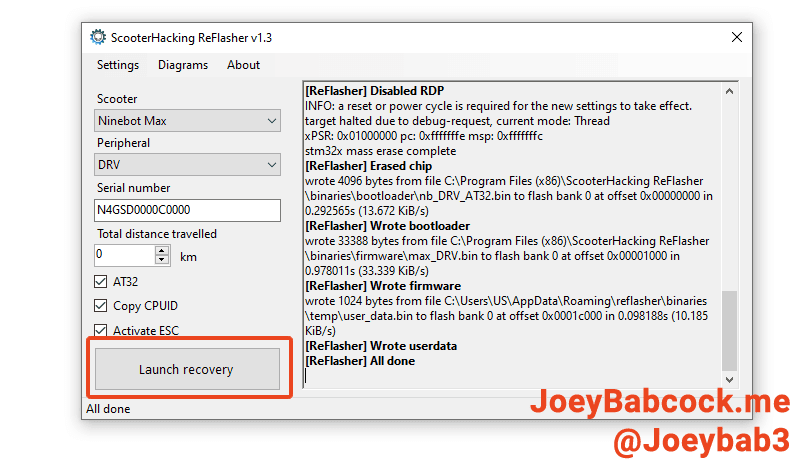
Press launch recovery then check the console for any errors.
Check the console to make sure there were no issues flashing.
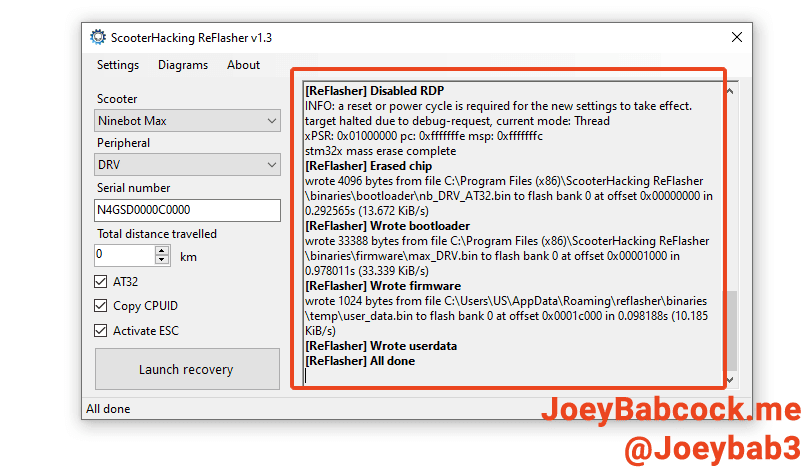
A successful flash indicated by no errors in the console.
Testing
Remove the STLink and plug back in the ESC and use ScooterHacking Utility to check that your version number is now 1.6.13 or 1.7.3.
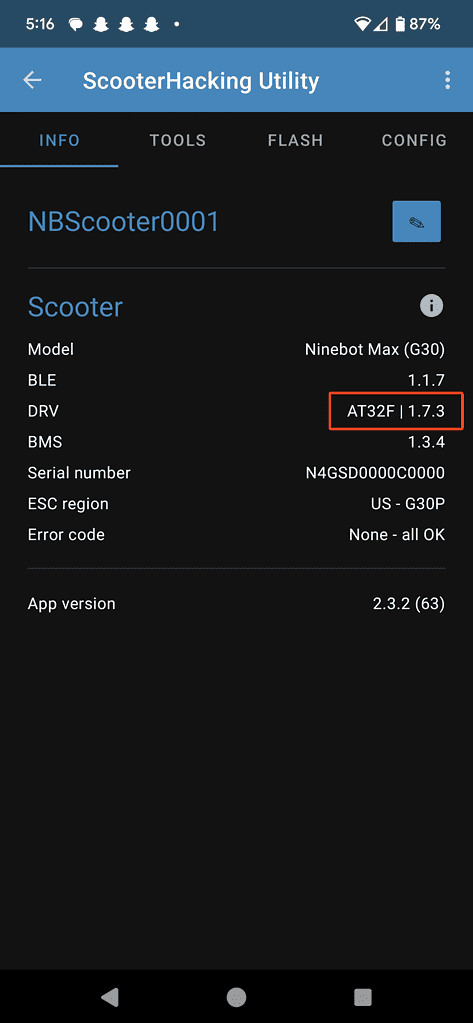
The downgrade was successful as shown here by the version number.
- Filed to:
- Electric Scooters,
- Ninebot,
- STLink
Comments
Howdy – have a G30 that has the 1.8.11 update. It has a Gen1 esc without the capacitors as in your photos. Have followed the guide and tried two different clone V2 st links (amazon – both firmware updated) – neither could communicate with the unit regardless of settings – tried with power via the battery connector as well as via the pinouts. The unit would connect as a USB device and power up (you can see the LED illuminated and windows recognizes it) but cannot connect via st link software. Apologies for the longwinded intro – ultimate question – is this an issue with clone St links from amazon, or is there some bad magic in the 1.8.11 update preventing the connection thx!
I just did a downgrade on 1.8.11 the other day, it is definitely still possible. it’s rare but possible the stlink is faulty, I remember having that issue at first when I was trying to buy stlinks, some of them just would not connect. I ended up buying like 10 from an aliexpress seller once I found one that had working ones. Also sometimes swdclk and swdio are switched on the labeling of those clones so try that as well.
This forum shows same AT32 ESC, but the ST-LINK connection (pinout) is different:
https://rollerplausch.com/attachments/img_5007-jpeg.21189/
https://rollerplausch.com/threads/uart-g30-new-v1-1-controller-unbricken.6463/#post-73875
Which guide do I follow? Did they make mistake, or did you, or do both methods work?
That is not a guide for how to STLink, that is for how to perform a UART downgrade. If you are able to perform a UART downgrade you are also able to perform a BLE downgrade.
Per the guide you linked:
This guide is for STLinking which is a different process and is currently the only way to downgrade newer versions.
Thank you kidnly for clarifying
Does anyone know which pin is which on the first board pictured?On the bottom of board they are labeled Tp1 Tp2 and Tp3
I accidentally swapped the gen 2/g30d images when I was last editing this article, it should be fixed now
The second picture in this guide is incorrect and not on this new controller. Please correct, thank you.
Feel free to send a better image, I don’t own a gen 2 max so I can’t take one myself.
The caption pretty explicitly explains this caveat if you read it.
Hey joey, great documentation
I’m about to follow it tonight. Just wondering if there is a chance I cound bust the controller. If I do is it fixable or would I need a new one?
Depends on how you break it, if you make sure to be careful and clear the capacitor before attempting then shorting isn’t really a big worry. That’s pretty much the only way to really mess up an esc, flashing the wrong firmware can still be fixed by using an stlink again.