Connecting Ninebot IAP via a NodeMCU
January 19th, 2020
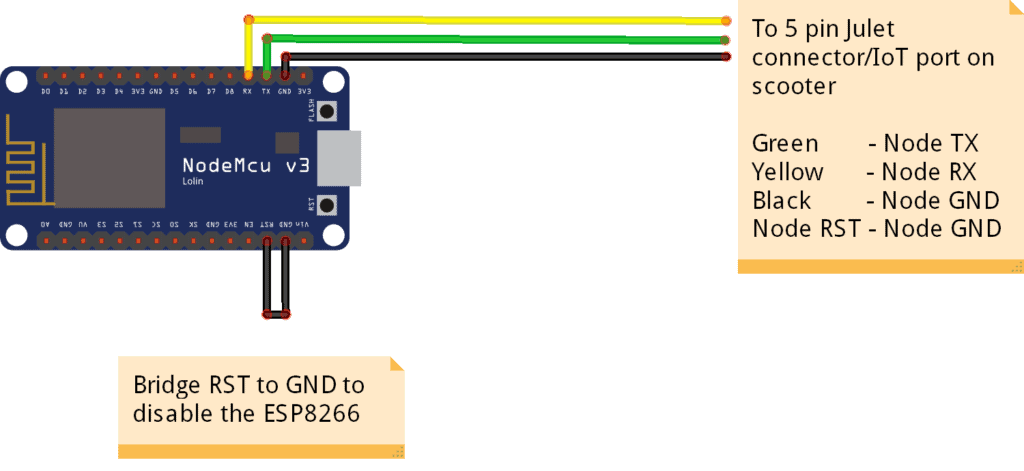
The layout for disabling the onboard ESP8266 in order to use just the CH340G.
Ninebot IAP is an awesome tool that was created to allow the flashing of custom software to Ninebot Scooters on windows using an internal protocol.
When other conventional BLE based software fails, IAP almost always will allow you to downgrade, upgrade, or customize the firmware and view scooter information.
With that, the hardest part of using IAP is really just connecting it. It’s easiest to buy a USB to serial adapters such as the CH340G or the CP2102, but you can also use a Wemos or other controller that has one built-in.
This tutorial covers using a NodeMCU, for a Wemos D1 Mini, View This Page.
What you’ll need:
- The latest version of Ninebot IAP from Here, as well as the CH340G Drivers.
- NodeMCU
- Jumpers, Male and Female
- 5 pin Julet connector
If you don’t have the male side of the cable, follow this guide to connect directly to the female end of the IoT cable.
Follow this guide for using the battery port instead if you don’t have an IoT port or if your scooter was not a rental vehicle.
To connect it, be sure to first strip the outer rubber coating on the exposed side of the connector. Take care not to damage the small wires within. Once you’ve done that, strip each of the 5 wires to allow for soldering.
To make the connector usable in other applications, I added female jumpers to the ends of each of the 5 wires. once you’ve prepared the wires, connect the yellow, green, and black wires as shown below:
Node RX  -> Connector Yellow
Node TX  -> Connector Green
Node GND -> Connector Ground
Node GND -> Node Reset/RST
From here, check Windows device manager to find which COM port the NodeMCUcomes up as.
In IAP, select this COM port as well as “IoT” as the interface.
Press connect, and the result should look similar to the below image:
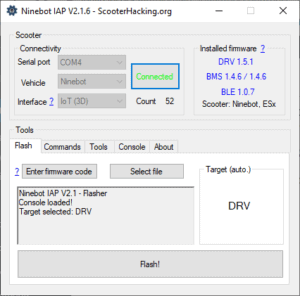
If the connection is successful, you should see firmware versions in the upper right-hand corner.
Comments
contact kamel
[email removed for privacy]
[phone number removed for privacy]
tanks
hello joeybab3 I would like to discuss with you about the scooter okai es100 alias electisan f350 patches I am a former bird service provider I still have bird zero bird one vehicles that I bought in Paris to do my testsx es I have all the necessary equipment to preserve this problem of patching I have original iot okai zk102map mounted in scooter alias electisan f350 has the original non-locking state which works without the sim card I also have esc controller not patched I these that the stm32 des iot its protected in reading already try my we could be able to recover the code via uart communications I leave you my email to contact me thank you see you soon I hope
[email removed for privacy]
Hi, you can connect over the iot line and send the unlock commands that are widely published that work on the older esc software versions using uart
salut joeybab3 j’aimerai discuter avec vous concernant les scooter okai es100 alias electisan f350 patche je sui un ancien prestataire bird jai encore des véhicule bird zero bird one que jai racheter à Paris pour fair mes essaix es je dispose de tous le matériel nécessaire pour résoudre ce problème de patche j’ai des iot d’origine okai zk102map monter dans scooter alias electisan f350 a letat non verrouiller dorigine qui fonctione sans la carte sim j’ai également des esc controleur non patcher je ces que les stm32 des iot son protéger en lecture deja essayer mes on devrais pouvoir réussir à récupérer les code via les communications uart je vous laisse mon mail pour me contacter merci à bientôt j’espère
salut joeybab3 j’aimerai discuter avec vous concernant les scooter okai es100 alias electisan f350 patche je sui un ancien prestataire bird jai encore des véhicule bird zero bird one que jai racheter à Paris pour fair mes essaix es je dispose de tous le matériel nécessaire pour résoudre ce problème de patche j’ai des iot d’origine okai zk102map monter dans scooter alias electisan f350 a letat non verrouiller dorigine qui fonctione sans la carte sim j’ai également des esc controleur non patcher je ces que les stm32 des iot son protéger en lecture deja essayer mes on devrais pouvoir réussir à récupérer les code via les communications uart je vous laisse mon mail pour me contacter merci à bientôt j’espère
[email removed for privacy]
hi i am attempting to flash the bms of my g30 segway. ive never even owned a scooter until now. i wanted to comment on the fact that i have read and searched every site immaginable to gain information. and time and time again you seem to have the correct information thats needed to do anything to a scooter. keep up the great work
Glad to hear my articles helped! Your experience is the exact reason I started writing these, the information out there is sparse and often contains wrong info so I tried my best to consolidate it in articles that can be easily followed.