How To Connect Ninebot IAP to the External Battery Port of a Ninebot ESX
February 9th, 2020
Intro
This method should only be used if Bluetooth is not available for some reason. If you have Bluetooth and a BLE-enabled computer, use this guide instead.
Alternatively, view all connection methods here.
Ninebot IAP makes flashing files to your scooter a breeze. It can also come in handy to downgrade the firmware or fix errors when flashing over BLE has failed.
What you will need:
- Male IoT cable or Male Jumpers
- Jumpers
- USB Serial converter, search “CP2102” on amazon
Connecting Ninebot IAP over the BMS port can be a little more finicky and involved, so if you have an IoT port, it’s recommended to use this guide instead.
Process
Placing the scooter so that the handlebar and battery current port is above you, connect two wires to the rightmost two male pins on the external battery connector.
RX and TX are the rightmost pins. You can find a pinout on the connector side of the external battery if you have one.
Connect the ground of the USB Serial to the top pin of the battery current line.
This is the ‘-‘ side of the battery.
You can do this by holding a male jumper to it for the duration of the flash.
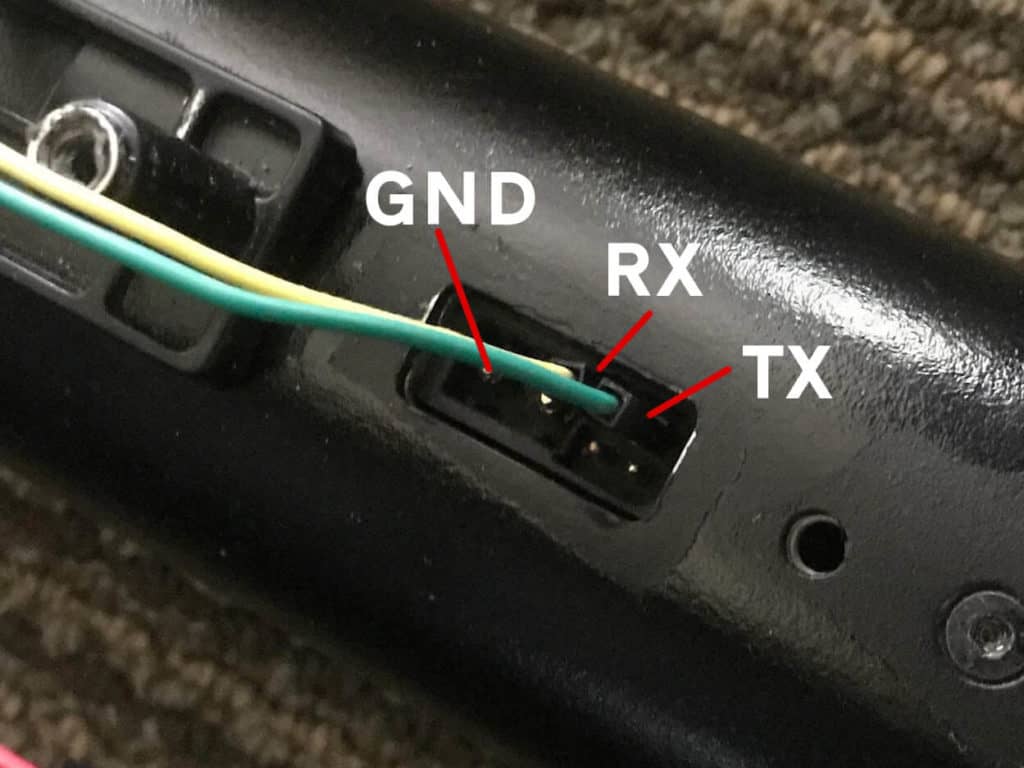
The right two pins are RX and TX for the battery data line. Connect your USB Serial device to them and ground to the top pin on the battery current port.
Software
From here, open Ninebot IAP, which can be downloaded from here.
Open device manager and find out which com port your USB Serial device is on. Scroll down to “Ports (COM & LPT)” and find the device you are using.
Below is a screenshot showing my CH340G USB Serial device on port “Com 11”.
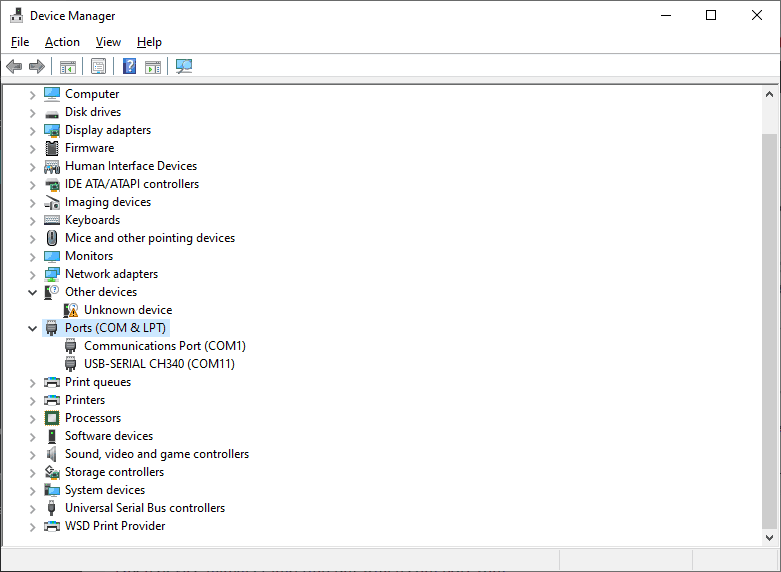
The windows device manager screen showing connected devices. Here, my USB-Serial device is my CH340G on port COM11.
In Ninebot IAP, make sure you select the correct COM port and for “vehicle” choose “Ninebot”, then “Interface” should be set to “IoT (3D)” or “BLE (3E)”.
Press “Connect” and verify that versions show up in the upper right-hand window.
If there are no versions shown, try swapping your RX and TX lines on the battery port.
Below the versions, there should be a field that says “Scooter: Ninebot, ESX”.
If it says “Unknown” but shows versions, go to the “About” tab and tick the box that says “No Model Restrictions”.
If you have everything set up and versions showing you should be able to flash whatever files you need.
- Filed to:
- Electric Scooters,
- Ninebot,
- Ninebot IAP,
- Tutorial
Comments
awesome job, one question: With this method can I flash Control Board and Dash Board without disassembling the Ninebot ES2?
Yes, on retail firmware and even certain unpatched rental firmware common on impounded vehicles. This guide was written before IAP supported Bluetooth, so if you have a flashed dashboard then Bluetooth might be a much easier way to go.