Connecting Ninebot IAP via a Wemos D1 Mini
January 18th, 2020
The layout for disabling the microcontroller and just using the onboard CH340G.
Ninebot IAP is an awesome tool that was created to allow the flashing of custom software to Ninebot Scooters on windows.
When other conventional BLE based software fails, IAP almost always will allow you to downgrade, upgrade, or customize the firmware and view scooter information.
With that, the hardest part of using IAP is really just connecting it. It’s easiest to buy a USB to serial adapters such as the CH340G or the CP2102, but you can also use a Wemos or other controller that has one built-in.
This tutorial covers using a Wemos D1 mini, for a NodeMCU, View This Page.
What you’ll need:
- The latest version of Ninebot IAP from Here, as well as the CH340G Drivers.
- Wemos D1 Mini
- Jumpers, Male and Female
- 5 pin Julet connector
If you don’t have the male side of the cable, follow this guide to connect directly to the female end of the IoT cable.
Follow this guide for using the battery port instead if you don’t have an IoT port or if your scooter was not a rental vehicle.
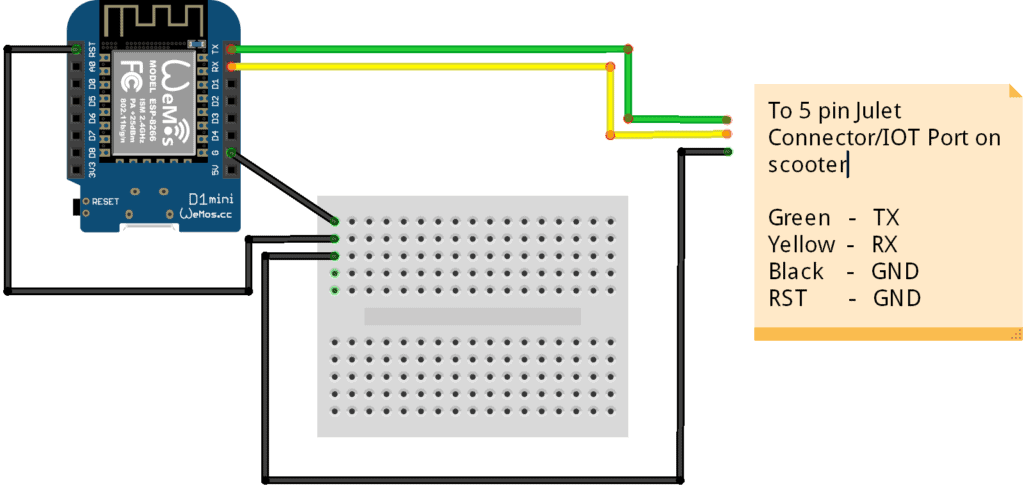
To connect it, be sure to first strip the outer rubber coating on the exposed side of the connector. Take care not to damage the small wires within. Once you’ve done that, strip each of the 5 wires to allow for soldering.
To make the connector usable in other applications, I added female jumpers to the ends of each of the 5 wires. once you’ve prepared the wires, connect the yellow, green, and black wires as shown below:
Wemos RX  -> Connector Yellow
Wemos TX  -> Connector Green
Wemos GND -> Connector Ground
Wemos GND -> Wemos Reset/RST
You may want to bridge GND to a breadboard, as shown above. This will make it easier to connect both the connector’s ground pin and the Wemos’s RST pin to GND.
From here, check Windows device manager to find which COM port the Wemos comes up as.
In IAP, select this COM port as well as “IoT” as the interface.
Press connect, and the result should look similar to the below image:
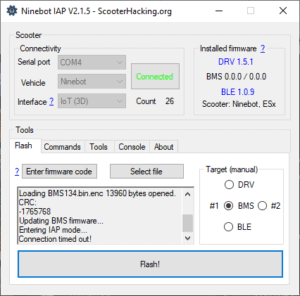
If the connection is successful, you should see firmware versions in the upper right-hand corner. in this case, my BMS was having trouble that prevented it from being shown.
Comments