Template:Ninebot ESX Front Motor Disassembly - Front Panels: Difference between revisions
Jump to navigation
Jump to search
No edit summary |
No edit summary |
||
| Line 1: | Line 1: | ||
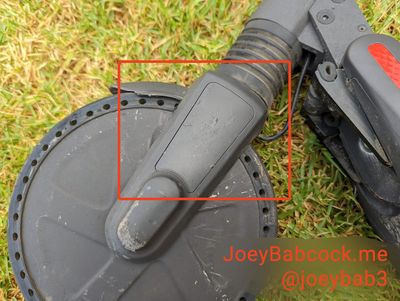
On either side of the motor, two plastic panels | On either side of the motor, two plastic panels cover the screws. | ||
Use a small flathead screwdriver to peel the panels back and loosen the clips carefully. | Use a small flathead screwdriver to peel the panels back and loosen the clips carefully. | ||
| Line 5: | Line 5: | ||
[[File: NinebotESXFrontMotorScrewPanels.jpg|thumb|center|400px|Carefully pry on both sides of the panel with a small flat head screwdriver.]] | [[File: NinebotESXFrontMotorScrewPanels.jpg|thumb|center|400px|Carefully pry on both sides of the panel with a small flat head screwdriver.]] | ||
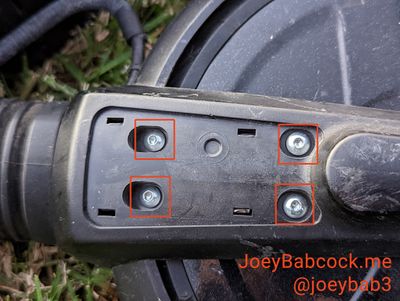
Once the clips are removed, there are | Once the clips are removed, there are four small button-head M2.5/2.5mm hex/Allen screws holding the motor cover in place. | ||
[[File: NinebotESXFrontMotorSidePanelScrews.jpg|thumb|center|400px|The 4 screws.]] | [[File: NinebotESXFrontMotorSidePanelScrews.jpg|thumb|center|400px|The 4 screws.]] | ||
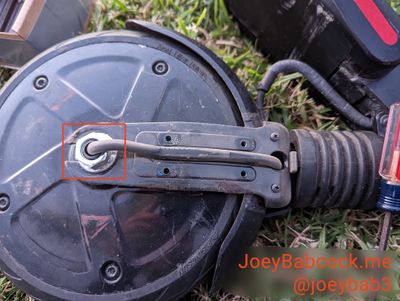
After these screws are removed you can slide away the bolt guard that they were holding down to access the bolts. | After these screws are removed, you can slide away the bolt guard that they were holding down to access the bolts. | ||
[[File: NinebotESXFrontMotorSidePanelRemoved.jpg|thumb|center|400px|The panel removed allowing access to the bolt.]] | [[File: NinebotESXFrontMotorSidePanelRemoved.jpg|thumb|center|400px|The panel removed allowing access to the bolt.]] | ||
Latest revision as of 18:44, 16 July 2025
On either side of the motor, two plastic panels cover the screws.
Use a small flathead screwdriver to peel the panels back and loosen the clips carefully.

Once the clips are removed, there are four small button-head M2.5/2.5mm hex/Allen screws holding the motor cover in place.

After these screws are removed, you can slide away the bolt guard that they were holding down to access the bolts.
