Template:Ninebot ESX Access Internals: Difference between revisions
No edit summary Tag: Reverted |
No edit summary Tag: Manual revert |
||
| Line 1: | Line 1: | ||
===Removing the Pole=== | |||
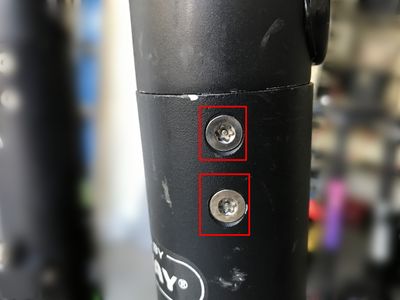
Remove the 4x Security Torx T25 screws or Hex Screws that hold the handlebar in place on the pole. | |||
[[File: NinebotEsxHandlebarScrews.jpg|thumb|center|400px|The handlebar screws in place.]] | |||
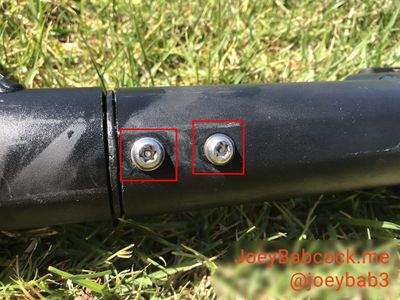
Remove the 4x Security Torx T30 screws or Hex screws that hold the pole to the base. | |||
[[File: NinebotEsxFrontPoleScrews.jpg|thumb|center|400px|The front pole screws in place.]] | |||
[[File: | [[File: NinebotEsxRearPoleScrews.jpg|thumb|center|400px|The rear pole screws in place.]] | ||
===Accessing the Internals=== | |||
If you have an external battery, two screws hold the battery on the bracket. | |||
These are either security hex or regular hex. | |||
[[File:NinebotESXExternalBatteryScrews.jpg|thumb|center|400px|The two screws holding the external battery on the bracket.]] | |||
This will expose 3 more screws. | |||
Take care removing these screws as they strip very easily. | |||
[[File: | [[File:NinebotESXExternalBatteryBracketScrews.jpg|thumb|center|400px|The 3 easily-strippable screws.]] | ||
The bracket may be slightly stuck but once these 3 screws are out it can be removed. | |||
If you do not have a bracket then you will have three screws holding the battery in place within the pole. | |||
[[File:NinebotESXInternalBatteryPoleScrews.jpg|thumb|center|400px|The 3 screws that hold the internal battery in place within the pole.]] | |||
You will also have a charging port cover to remove. | |||
Remove the top cover to reveal two screws holding the cover on. | |||
[[File: | [[File:NinebotESXChargingPortCoverScrews.jpg|thumb|center|400px|The port cover removed.]] | ||
Finally, one more screw holds the ESC in place on the pole. | |||
[[File:NinebotESXESCPoleScrew.jpg|thumb|center|400px|The final screw holding the ESC in place within the pole.]] | |||
Next comes arguably the most annoying part of the disassembly, removing the waterproofing grommets. | |||
On the top and the bottom is two grommets that are twisted in place. | |||
Press down hard with a large flathead screwdriver and twist counter-clockwise until the slots line up with the metal ridge within the pole. | |||
[[File: | [[File:NinebotESXInternalRubberGrommets.jpg|thumb|center|400px|Keep the grommets attached if you can.]] | ||
[[File:NinebotESXInternalRubberGrommetsRemoved.jpg|thumb|center|400px|The parts of the grommet.]] | |||
In some cases, pushing the rubber inner part through the plastic retainer ring will make it easier to remove. | |||
Attempt to keep the wires pushed through the rubber part. | |||
Once both are separated the whole mechanism slides easily out of the pole unless the pole has been damaged or bent. | |||
[[File:NinebotESXInternalElectricalsRemoved.jpg|thumb|center|400px|The battery/esc internals. Here the ESC is highlighted but you want to separate it from the battery.]] | |||
A plastic holder clips the battery and ESC together. | |||
Separate the ESC from the battery and carefully unplug the 4-pin data cable and the power cable. | |||
Latest revision as of 01:40, 2 September 2023
Removing the Pole
Remove the 4x Security Torx T25 screws or Hex Screws that hold the handlebar in place on the pole.
Remove the 4x Security Torx T30 screws or Hex screws that hold the pole to the base.
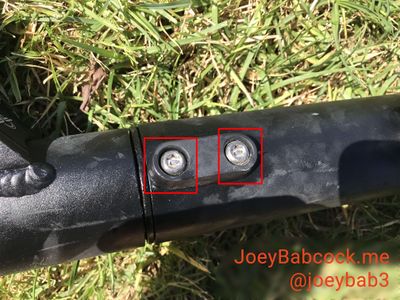
Accessing the Internals
If you have an external battery, two screws hold the battery on the bracket.
These are either security hex or regular hex.
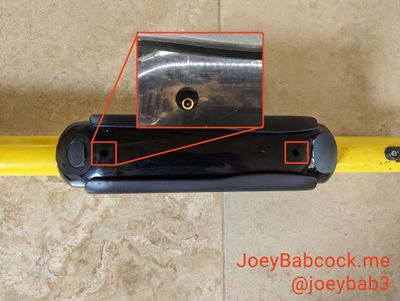
This will expose 3 more screws.
Take care removing these screws as they strip very easily.

The bracket may be slightly stuck but once these 3 screws are out it can be removed.
If you do not have a bracket then you will have three screws holding the battery in place within the pole.
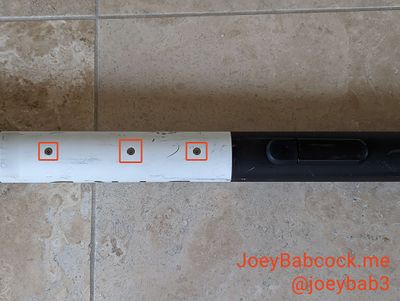
You will also have a charging port cover to remove.
Remove the top cover to reveal two screws holding the cover on.
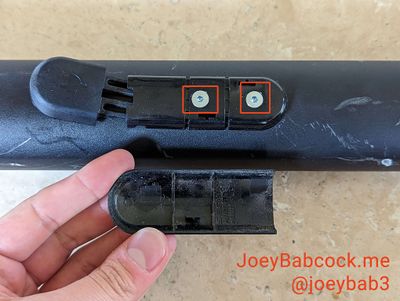
Finally, one more screw holds the ESC in place on the pole.
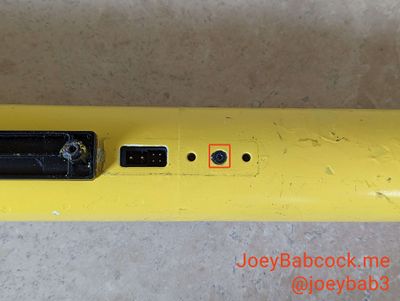
Next comes arguably the most annoying part of the disassembly, removing the waterproofing grommets.
On the top and the bottom is two grommets that are twisted in place.
Press down hard with a large flathead screwdriver and twist counter-clockwise until the slots line up with the metal ridge within the pole.
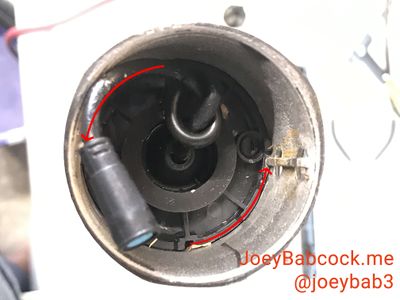
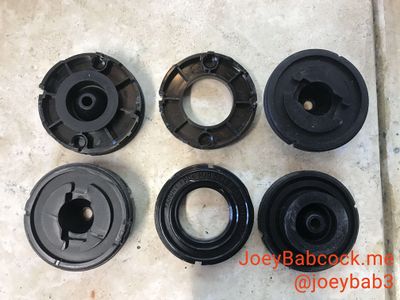
In some cases, pushing the rubber inner part through the plastic retainer ring will make it easier to remove.
Attempt to keep the wires pushed through the rubber part.
Once both are separated the whole mechanism slides easily out of the pole unless the pole has been damaged or bent.
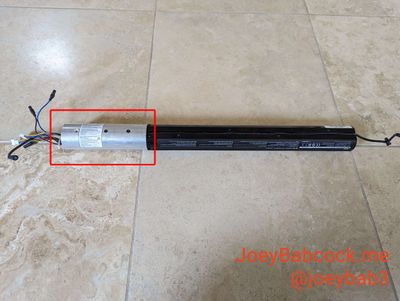
A plastic holder clips the battery and ESC together.
Separate the ESC from the battery and carefully unplug the 4-pin data cable and the power cable.